

What is a Data Gateway in Power BI?
When creating reports in Power BI, the end goal is to make them useful to many users. In order to share reports created in Power BI, they must be published to the cloud (known as PowerBI.com). Once nestled in the cloud, the data in the reports will either stand static, or will need to be updated on a regular basis. In order to refresh data and keep end users in up to date, the cloud must have access to data sources. This is where you need a Data Gateway. Think of a data gateway as a bridge between your on-premises data sources and the cloud.
A gateway should be installed on a machine that is always on and connected to the internet. Gateway cannot access information from a machine that is powered off or loses internet.
- Before installing, take into consideration that if you are installing on a laptop and it is turned off, not connected to the internet, or asleep, the gateway won’t work and the data in the cloud will not sync with your on-prem data. Also, if the machine on which the gateway is installed is connected to a wireless network, the gateway may perform more slowly and that will take longer for the data to sync with the cloud and your on-prem data.
Power BI Gateway can be installed in two ways:
- On-premises data gateway – This gateway can be used by any user that has access to the server on which the gateway is installed. It can be used for scheduling refreshes and live queries.
- On-premises data gateway (Personal mode) – This gateway is can only be used by the person setting up the gateway. This mode is only used for scheduling refreshes in Power BI. At the time of writing, Live Connection, DirectQuery, Power Apps, Logic Apps, and Microsoft Flow are not supported.
Only one gateway in each mode can be installed on one machine. That is, you may install one gateway in personal mode, and another in regular mode. You cannot install two or more personal mode gateways on one machine. You can, however, manage multiple gateways from the same interface on Power BI.
Installing a Gateway
To install a gateway, you will first need to sign on to PowerBI.com. Take note that this is NOT the desktop app, this is the cloud-based service. Look at the top right on the menu bar, click on the icon that looks like an arrow pointing down. The dropdown will reveal several actions. You will want to choose ‘Data Gateway’.

This will take you to a new webpage where you will be able to start your Gateway download. Click on the DOWNLOAD GATEWAY button and wait for the download to begin. Once the Download Installer has finished, open up the exe and follow instructions.

When the installer opens, you will be ready to start setting up your gateway.

Click NEXT to choose the type of gateway you need. Before you choose, take into consideration the role of each. Remember that the Personal mode is only useful for on demand refresh and scheduling refresh in PowerBI and cannot be used for Live or DirectQuery. On-premises data gateway can be used by multiple users and does support both schedule refresh and DirectQuery.
Please note the following in regard to installing either mode:
- both gateways require 64-bit Windows operating systems
- gateways can’t be installed on a domain controller
- you can install up to two On-premises data gateways on the same computer, one running in each mode (personal and standard)
- you cannot have more than one gateway running in the same mode on the same computer
- you can install multiple On-premises data gateways on different computers, and manage them all from the same Power BI gateway management interface (not including Personal mode)
- You can only have one Personal mode gateway running for each Power BI user. If you install another Personal mode gateway for the same user, even on a different computer, the most recent installation replaces the existing previous installation.

Once you have chosen your mode and clicked next, it will take a a few seconds for it to download and get ready to install your gateway.
The next step is to point the download to the drive on wish you want the install to go. You will want the Gateway positioned as close to your data source as possible. Be sure to read and accept the terms of use and privacy statement.
Upon successful installation, you will need to add an email address to use with this gateway. Next you will need to sign in.
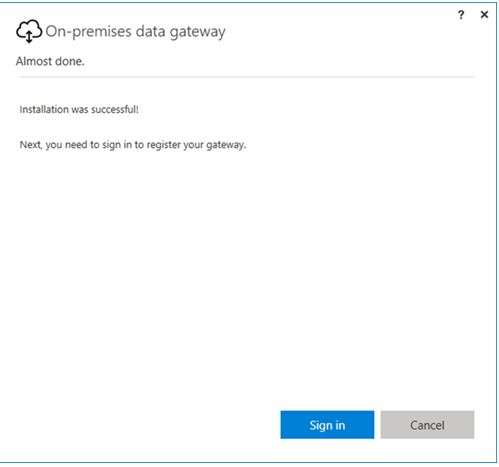
We have successful installation of our Gateway! Now you will have the option to configure a new gateway, migrate, restore, or take over an existing gateway. Here we will register the data gateway.

To configure a new gateway, you will need to enter a name for the gateway, enter a recovery key (minimum 8 characters) and finally, select Configure. Be sure to store your recovery key in a safe place. You will need it in the future if you ever need to migrate, restore, or take over a gateway.

Congratulations, you now have a successful installation and configuration of Gateway! Now you will be able to connect to on-prem data sources! For use with Power BI, you will need to add your data sources to the gateway within the Power BI service. This is done by going to the menu bar, clicking on the gear icon and choosing MANAGE GATEWAYS from the drop down. We will cover adding data sources in the next blog!
*For a more in-depth look at Gateway installation, information can be found on Microsoft Docs.
